I like to show you how easy you can modify your AC30 without destroying it and with a little knowledge in wood and soldering to achieve this new feature. As the AC30s a different, I will describe my method which can be used with every AC30 that has the ability to change between 8 and 16 Ohms.
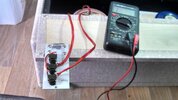
So that you know what I mean, here is a picture of the complete mod. I´ve just added three new jacks and soldered the speakers in a way that you can switch the speakers by connecting the cable to the one you want. It needs less modification on the cabinet itself, so you easily can unmod the AC30 if you wish to sell one.
Now lets begin with this modification.
1. These are the components you need:
- Metal plate, I used an old piece of a chassis that was around. You may use some aluminium you can buy in your local bulding supply store, it´s easier to handle.
- Three jacks, mono, switched, 1/4"/6,3mm.
- 4 screws, I used 4mm / 25mm (depends on how thick your metal plate is.
- Piece of rubber to uncouple from vibration.
- One additional plug.
- Soldering stuff, some cable, drill.
First the big ones for the jacks. Note that the jacks need some space, I drilled every 15mm. Then the holes for the screws you need to fix on the cabinets back.
3. Mount everything
on the plate and measure where to fix it on the cabinets wood. Take the rubber beween wood and metal plate and have a look that the fixed metal plate does not touch the side of the cabinet. This leads to unwanted vibration and noise, even with a 3mm thick plate I use. Drill smaller holes on in the wood before you put the screws in.
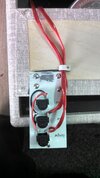
4. Soldering
Start to solder the jacks. If you´ve mounted them in the same direction you now have one side with the switch (left to connect the speakers) and the other side. As you can see on the picture, we now solder the right side. Take the hot from jack 1 and solder it to the left side of jack 3 (hot). Take the ground wire from jack 2 and solder it to left side of jack 3 (ground). Now solder the ground from jack 1 to the hot of jack 2, both on the right side. If you now plug in in jack 3 you have both speakers wired in series which gives you Speaker 1 Ohms + Speaker 2 Ohms (here 8 + 8 = 16 Ohms).
Now simply solder speaker one to the switch (left) side of jack 1 and speaker two to jack 2. If you plug in in jack 1, you have only speaker on, in jack 2 only speaker two and in jack 3, both in series.
Solder the other ends of the wires to the speakers. I put some paper between to prevent the speakers from tin while soldering. You may fix the cables as you can see on the pictures.
5. Wire
You now need a wire with two plugs to plug in. I used the one that was originally soldered with the speakers, shortened it and bought an additional plug from amphenol because these are as small as the original.
Finish
Now just plug in and do the finishing work then you have your speaker switching option at low price for less than 10 Euro for jacks, plug and cable. Below there are some more pictures for you.
Author: Jens Winkler
Anhänge


Zuletzt bearbeitet von einem Moderator:
